Trust Your Technolust

Month: June 2021

How to get TeamSpeak 3 Dark Mode

Prerequisites

An installed TeamSpeak client, if you don’t have TeamSpeak download it from https://teamspeak.com/en/downloads/

While TeamSpeak 5 does indeed have a dark theme built in by default, those of us still using TeamSpeak 3 do not have that luxury.

There are actually two different ways to install TeamSpeak themes (which are really just plugins, they are both installed the exact same way), we’ll show you both ways. First we need to download a dark mode theme, there are a number of the dark themes but the one I personally use and recommend is DarkenTS – Dissension.

Other honourable mentions include:

NekoSpeak (https://www.myteamspeak.com/addons/30f4df31-7e2e-4d09-9d28-40b1bcfa4db4)

NekoSpeak is nearly a black TeamSpeak theme, minus the small amount of gold included

Darcula (https://www.myteamspeak.com/addons/30f4df31-7e2e-4d09-9d28-40b1bcfa4db4)

Darcula is a theme based on the Dark theme for JetBrains products, so programmers amongst you should be very comfortable with this TeamSpeak theme.

These alternatives can both be installed with the exact same instructions.

Option one (nearly) automatic

Press tools => options in your TeamSpeak menu bar and navigate to the Addons panel, when you’re there press “Browse online”.

TeamSpeak Options Addons List

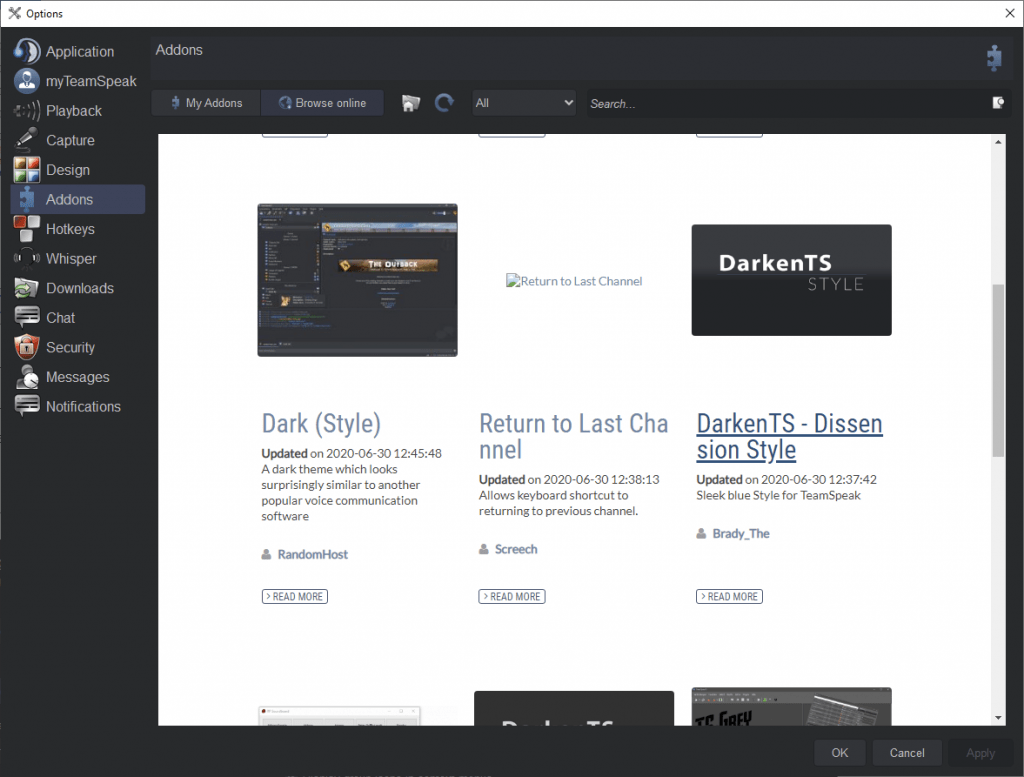
From this screen you can either search for “dark”, at the time of writing it’s near the very top of the default addons you initially are presented with, so you can easily find it by scrolling down a tiny amount.

Click the theme you’re looking to try out

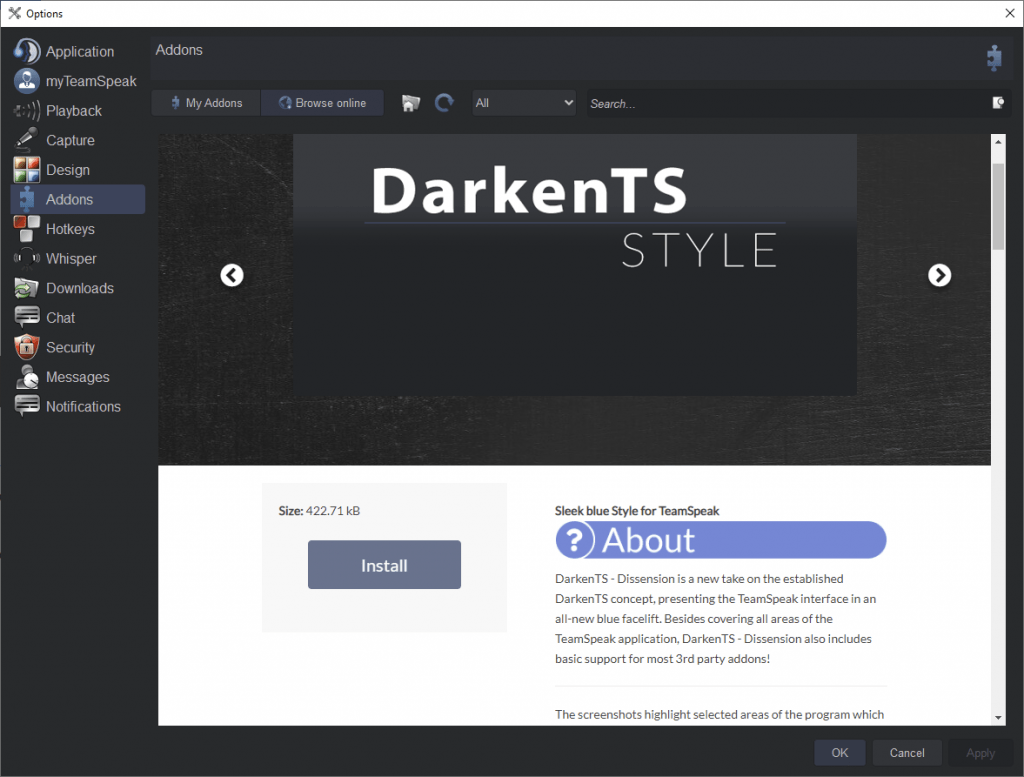
Once the page has loaded click the “install” button

TeamSpeak Options, Addon Window

The theme should now be installed and automatically set, if not please see below for the manual way of installing themes.

Option 2 (manual install)

https://www.myteamspeak.com/addons/4a834709-3315-4c53-a80d-b09efd03fce2

Press the “Download” button, and allow your browser to download the file

TeamSpeak Addons Download Window Firefox

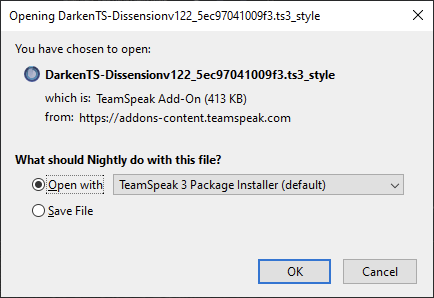
Open the file and you will be presented with a windows that looks something like this :

TeamSpeak Addon Installer Window

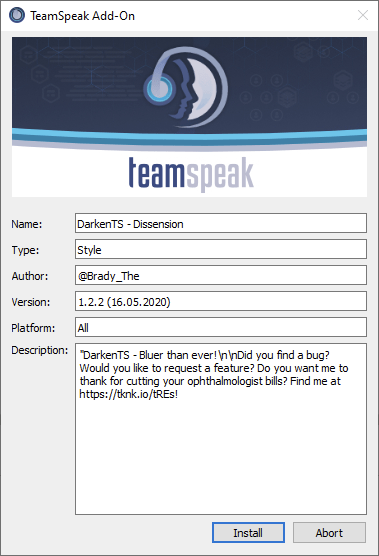
Press Install and restart your TeamSpeak client to complete the install.

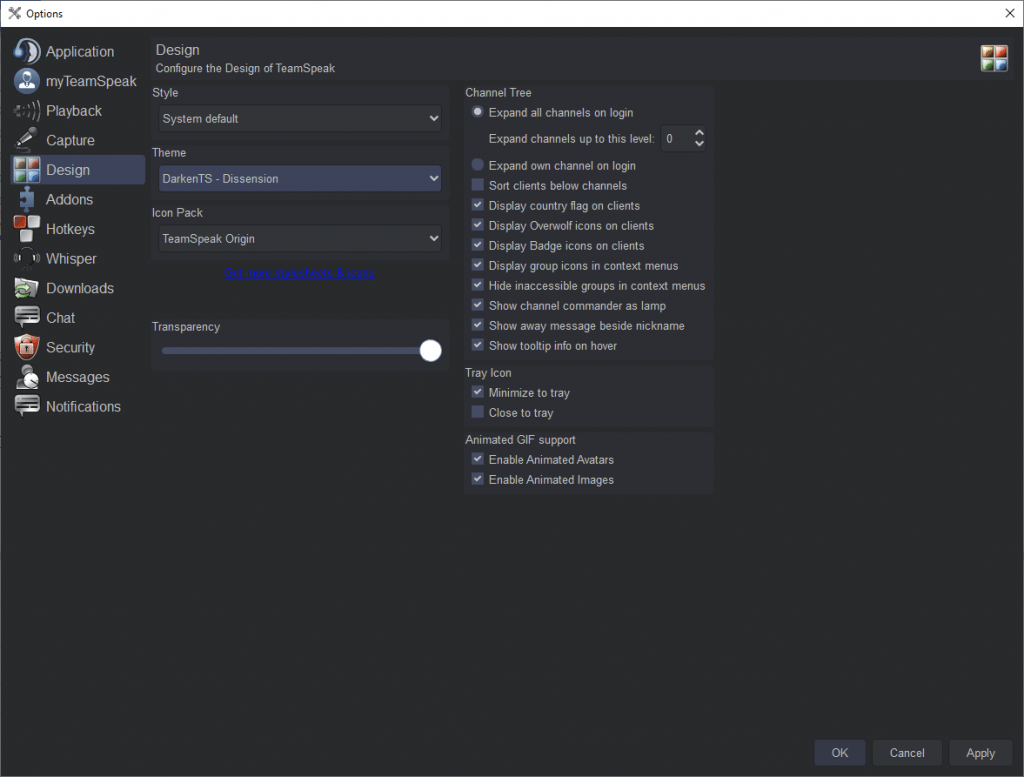
After TeamSpeak has opened you press tools => options on the menu bar and navigate to Design, you can then set your preferred theme there, press apply and your client will update with the new theme.

The TeamSpeak 3 Design options Page

I hope that this explains how easy it is to install TeamSpeaak themes, these same methods can also be used to install TeamSpeak plugins. Need someone to talk to while using your shiny new Dark Mode TeamSpeak? Try finding a server on a TeamSpeak Server List.

Basic cPanel Settings You Should Change

The cPanel Control Panel is a graphical interface used to manage your website’s hosting account. It provides all the tools you need to create and manage your website, including a file manager, password manager, and domain manager.

The cPanel Control Panel is easy to use and provides all the features you need to manage your website. You can use the file manager to upload and manage your website’s files, the password manager to create and manage your website’s passwords, and the domain manager to manage your website’s domains.

The cPanel Control Panel also includes a variety of other features, such as a built-in website builder, a one-click installer for popular applications, and a variety of templates you can use to create your website.

When first installing cPanel many users are going to be simply overwhelmed with the amount of options that WHM presents the server administrator, but here are some options and packages that (in our opinion) you should change or install as soon as you install it.

CSF

The CSF firewall is a one stop shop for preventing the worst brute force attacks your server will see, it will protect multiple services on a cPanel server.

Tweak Settings

Tweak settings can be found near the top of the left hand menu on WHM.

Turn OFF “BoxTrapper Spam Trap”, this options sounds good in theory, but will usually end up with you being listed on various mail block lists.

Setting “Max hourly emails per domain” to something like 5000 will at least limit the amount of spam that a single user can send

Apache Configuration > Global Configuration

Disable “Trace”, it’s a little used feature that can give an adversary more information about your server

Set “Server Signature” to Off to hide some version information on error pages

Set “Server Tokens”  to “Product Only” to hide as much information about your server setup easily.

Exim Configuration Manager > Advanced Editor

Make sure the following is set on log_selector, this gives you more data to track spammers using your server

log_selector = +arguments +subject +received_recipients

EasyApache

As a starting point we would recommend the “CloudLinux + All PHP options + OpCache +mod_lsapi” profile if you’re using CloudLinux or “All PHP options + OpCache” if you’re using a CentOS install, these are both great baseliens that should support most things your customers need.

cPanel Addons

There are a vast amount of addons you can get for your cPanel server, however there are some key ones you might want to consider depending on your use case

CloudLinux

CloudLinux is an alternative Linux distribution that is fully focussed on the security of shared systems, this in our opinion is an essential addon for any cPanel server, mainly due to the PHP selector, which allows each user to use their own PHP version, also of great use to us is the ability to separate users in to their own LVE (Lightweight Virtual Environment), this effectively stops users from spying on one anothers files.

LiteSpeed Enterprise

LiteSpeed is a fantastic server for serving high load websites, while that feature sounds great in theory it’s mostly reserved for higher load websites, so if you’re just starting out it may not make much sense to spend the extra money on this.

Imunify360

Imunify is essentially a HIPS and Anti Virus system for your cPanel (and other control panels) server. It is great for detecting malware that users have uploaded to your server in real-time, which is great for a shared hosting envvironment where users and webmasters cannot be trusted fully. This may have more limited use on internal and/or highly controlled systems but it may be worth the piece of mind for some people.

Simple steps you can take to help secure your Linux server

There’s a lot of blog posts around the internet with a lot of steps you can take to “hack proof” your server, while these tips are not going to make your server “hack proof” they will enhance your security profile, especially against automated scanners and exploiters, which rely on some of these simple things to exist on your server.

Your Distribution

Your choice of distribution will affect your baseline security profile, but all systems should be able to apply all the tweaks we’re giving you here, We will be doing these tweaks on a vanilla Ubuntu 20.04 install, this will work for other distributions but config files may be in other locations, you can use the excellent “locate” and/or “find” utilities to find these config files if they’re not in the places we’ve listed.

Firewalls

Consider the excellent iptables script/addon, csf, which you can find here https://www.configserver.com/cp/csf.html

This script will automatically blacklist any IP’s that are detected to be brute-forcing various services on your system, this feature is not enabled by default when you install csf, please ensure the config is working and no errors are printed when you run “csf -r”, after you’re sure everything is working you can then enable csf permanently by changing TESTING = 1 to 0 in /etc/csf/csf.conf

SSH

Configuration location : /etc/ssh/sshd_config

Change your SSH port

Changing your SSH port is one of the easiest ways to deter automated bots from attempting to breach your server, we can change the SSH port by setting one single line in the config

Port 12345

If you do change this port be sure to open the port in your firewall as well when you change this or you will lock yourself out from your server.

X11Forwarding No

X11 forwarding has been used in exploits in the past, if you’re not sure if you’re using this, you probably aren’t.

Nginx

Configuration location : /etc/nginx/nginx.conf

We can remove the exact version number being appended to all the responses by adding the following, this will remove the version number and potentially the Operating System being send in the “server” header of any request, it is possible to completely remove the header if you are willing to compile nginx from source, but that is beyond the scope of “simple steps”.

server_tokens off;

in to the http {} block of the nginx config, note the semi colon at the end of the line, it is needed in nginx configs.

PHP

Configuration location : /etc/php/8.0/apache2/php.ini
This varies based on your PHP version and SAPI (Server API) you are using for PHP, for example nginx will use /fpm/ instead of /apache2/ and the command line PHP interpreter will use /cli/

We can disable the PHP version being appended to every server response by adding the following to php.ini, this will completely remove the x-powered-by header from all responses PHP serves.

expose_php = Off

We can disable some potentially dangerous functions from being used by malicious scripts by adding them to the disable_functions options, some applications may require functions like “exec” and “curl_*” to please be sure to check your application source before you disable these, you could use the useful “grep” program to check your source quickly, for example “grep -iR curl_exec /var/www/html/”

disable_functions = exec,passthru,shell_exec,system,proc_open,popen,curl_exec,curl_multi_exec,parse_ini_file,show_source

Disabling the url fopen options will stop functions like fopen from intercepting a URL as a file and downloading this file to execute it, this is a common avenue for hackers to download files on to your server, however a proper code audit should be done on your applications source code to ensure this isn’t exploitable in the first place.

allow_url_fopen = Off

Depending on whether your PHP application needs to accept file uploads you can blanket disable this feature to help cripple any web shells or other programming errors being used to upload malicious content to your server.

file_uploads = Off

Raising limits for the xt_recent iptables module

If you’re a fan of trying to limit the effects of a DDoS on your services you’ve probably tried to limit the amount of connections that can be made to a port, possibly by using the xt_recent iptables module, by default the limits imposed on the module are rather low, which made this module of limited use in our case due to the large amount of connections we have normally. The default of most distributions only store the last 100 IP’s and 20 timestamps of each packet from those IP’s, we can increase this to allow us to track more connections with more granularity, for example with the changes below we can now monitor up to 200 IP’s and the times of the last 255 packets sent by each IP.

nano /etc/modprobe.d/xt_recent.conf

Add the following line to the file

options xt_recent ip_pkt_list_tot=255 ip_list_tot=200

Before we unload the xt_recent module we need to unload all the modules that use the recent module, we can achieve this by simply using the command

service iptables stop

Alternatively if you’re using csf you can unload all the rules it by simply usingthe below command, there was no need to stop iptables when using this method.

csf -x

Now we can unload the xt_recent module

modprobe -r xt_recent

After the module has unload successfully you can then reload the module with

modprobe xt_recent

Now we can restart iptables

service iptables start

Or if you’re using csf

csf -e


© 2024 TL;DR Tips

Theme by Anders NorénUp ↑